Signs Your Fence Posts Are Failing in Chattanooga’s Freeze-Thaw Winters
You just paid for a new wood fence, so the last thing you want is a lean showing up after the first hard winter. In Chattanooga, the signs your fence posts are failing almost always trace back to two things: clay-heavy soil and freeze-thaw cycles that push posts and footings around from December through February. Fence post frost heave—the upward thrust of frozen soil against posts and concrete—is a real problem, but the good news is you can catch post problems early, and most of them have a straightforward fix if you act before the fence starts to sag.
This guide walks you through a step-by-step post check you can do in under an hour. It also covers what each finding means, which fixes make sense, and when to bring in a pro instead of wrestling with a concrete footing yourself.
Understanding Fence Post Frost Heave in Winter Conditions
Chattanooga winters rarely stay frozen for long. The ground freezes overnight, thaws by afternoon, and repeats that cycle dozens of times each season. Water in the clay soil expands when it freezes, and that expansion pushes against posts and concrete footings. When the ground thaws, the soil settles back unevenly.
Over several winters, that push-and-settle cycle can lift a footing, tilt a post, or open a gap between the post and the soil around it. Water then pools in that gap, which speeds up rot at the ground line, the exact spot where wood posts fail first. Even a new fence is not immune; a post that was not tamped tight or set with enough concrete will loosen faster under these conditions.
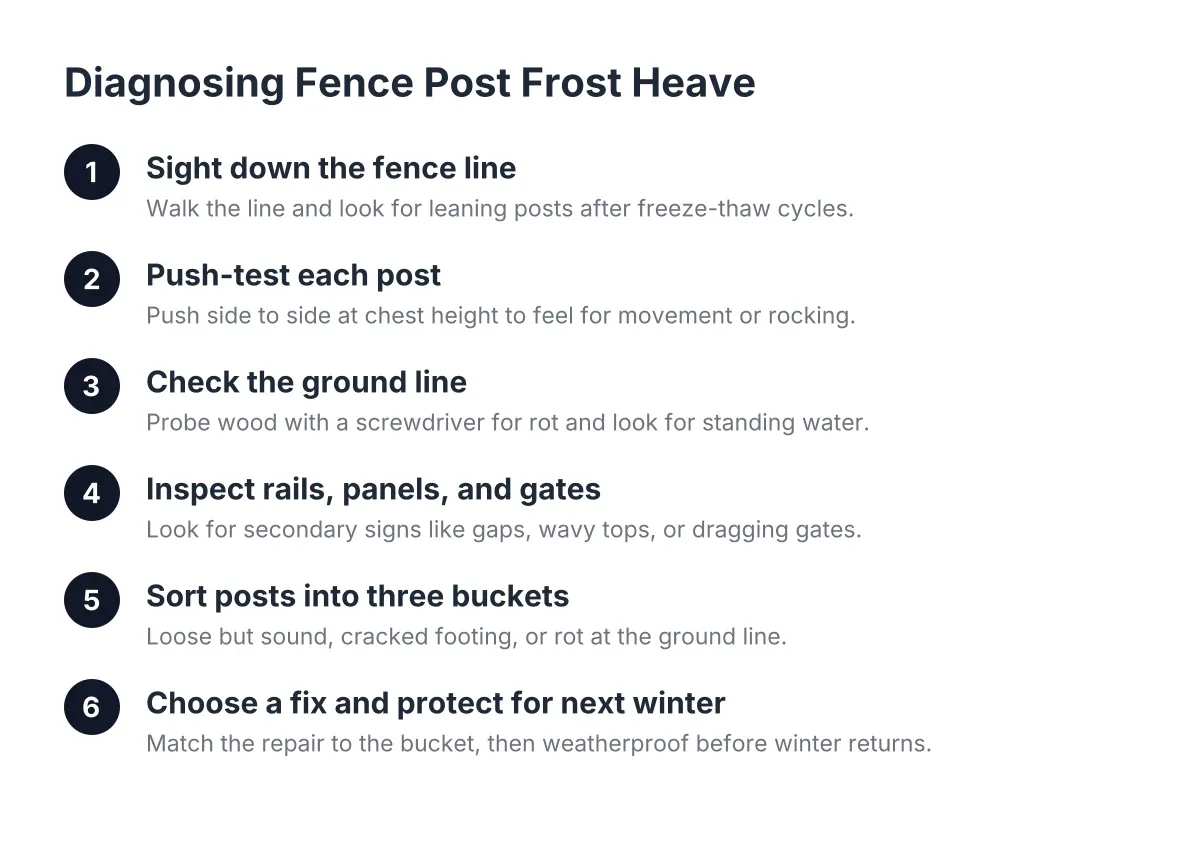
Step 1: Walk the Fence Line and Sight Down It
Start at one corner of your fence and look straight down the line of posts. A healthy fence line looks like a row of soldiers; every post top sits at the same tilt, which should be none. Any post that leans toward or away from the line stands out immediately when you sight down it.
Do this walk in late winter or early spring, after the freeze-thaw cycles have done their work. Mark any leaning post with painter's tape or a chalk mark. A lean of even an inch or two at the top is one of the earliest signs your fence posts have moved in the ground, long before a panel sags or a gate drags.
Step 2: Push on Each Post to Test for Movement
Grab each post at chest height and push it firmly side to side, perpendicular to the fence line. A solid post should not move at all. What you feel tells you where the problem lives:
- No movement: The post and footing are sound. Move on.
- Slight flex at the top, solid at the base: Normal for wood under hand pressure. Not a concern.
- The whole post rocks and you see soil shift at the base: The footing has lost its grip on the soil. Freeze-thaw heave or poor compaction is the likely cause.
- The post pivots at a point below ground: The concrete footing may have cracked. A footing that was poured too small is prone to breaking under lateral force, and the break becomes a permanent wobble point.
- The post moves inside the concrete: The wood has shrunk or rotted inside the footing, leaving a loose sleeve.
Write down which posts move and how. That record matters when you decide between tightening, reinforcing, and replacing.
Step 3: Check the Ground Line for Rot and Standing Water
Kneel at each post and inspect the few inches where wood meets soil or concrete. This is where posts die. Probe the wood with a flathead screwdriver. Sound wood resists; rotted wood gives way like a sponge and the screwdriver sinks in with light pressure.
In addition, look for these warning signs at the base:
- Soil pulled away from the post, leaving a gap that holds water
- A dark, damp ring on the post that never dries out
- Concrete that sits below grade and forms a cup that collects rain
- Fungus, moss, or soft gray fibers at the ground line
Here is a detail that surprises homeowners: concrete poured tight around a wood post can trap moisture against the grain and speed up rot compared to a well-draining backfill. So a post can rot at the ground line even when the footing itself is fine. If your screwdriver sinks in but the footing feels solid, remember that; it changes which repair makes sense in Step 6.
Step 4: Inspect Rails, Panels, and Gates for Secondary Signs Your Posts Are Shifting
Posts fail quietly, but the fence attached to them tells on them. Walk the line again and look at everything between the posts. Common giveaways include:
- Horizontal rails pulling away from a post, or nail and screw heads backing out
- A wavy or scalloped fence top when you sight along it
- Gaps opening between panels that used to sit tight
- A gate that dragged all winter, then swung fine in spring
That last one is a Chattanooga classic. Suppose a homeowner in Hixson notices the gate latch stopped lining up in January, then mysteriously fixed itself by April. In that scenario, frost heave from frozen soil lifted the gate post during the freeze and the thaw let it settle back, slightly off from where it started. Each cycle moves it a little more, and by the second or third winter the gate needs repair year-round. Gate posts carry the most load on the whole fence, so they show freeze-thaw damage first.
Step 5: Sort Each Problem Post Into One of Three Buckets
Next, take your notes from Steps 1 through 4 and sort every flagged post into one of three categories. This keeps you from over-fixing a minor issue or under-fixing a serious one.
Bucket 1: Loose but sound
The post rocks in the soil, but the wood is solid and the footing is intact. The fix is usually re-tamping and re-compacting the soil around the footing, or adding concrete around an undersized footing. When the fence post frost heave lifts a footing, thorough tamping matters more than most people think; loose backfill is the main reason posts work free under wind and water load.
Bucket 2: Cracked or undersized footing
The post pivots below grade, or you can see a crack in the exposed concrete. A footing break will not heal, and the wobble point only grows. These posts need a new or enlarged footing. A fence post needs generous concrete on all sides to resist lateral force; a skinny collar of concrete fails again.
Bucket 3: Rot at the ground line
The screwdriver test failed. Paint and stain on the panels will not save a post that is rotting where it enters the ground; posts commonly fail from rot even on fences where the boards have been maintained for years. These posts need structural repair or replacement, covered next.
Step 6: Choose the Right Fix for a Failing Post
Your first instinct with a rotted post may be to rip out the post and its concrete footing and start over. That is sometimes right, but it is not always the practical move, especially on a newer fence. Posts concreted in within the past year or two grip hard and fight removal, while much older footings often pop out with less effort.
For a post rotted at the ground line but solid above it, one cost-effective approach is to cut the post off above the bad section and set a new steel post into the original concrete footing. You keep the footing you already paid for, the fence stops sagging, and the work done now effectively carries forward if you ever do a full fence replacement with steel posts later. Steel also sidesteps the warping, twisting, and rot that wood posts develop over time.
For a loose post with sound wood, a driven fence post repair spike or a bolt-on steel stiffener can brace the post against the footing. These work best as interim fixes on posts that are starting to move, not on posts that have fully rotted through.
However, know the limits of DIY here. Re-tamping soil and driving a repair spike are reasonable weekend jobs. Breaking out a cracked footing in Chattanooga clay, plumbing a new gate post, or splicing steel into an existing footing is heavy, precise work, and getting a gate post wrong means a gate that never hangs right. A fence repair company can usually handle several problem posts in a single visit, and a repair quote costs you nothing but a phone call. If more than a quarter of your posts land in Bucket 2 or 3, ask for a repair-versus-replacement opinion before spending on piecemeal fixes.
Step 7: Protect Your New Fence Before Next Winter
Finally, if your fence is new, prevention is cheaper than any repair. A few habits make a real difference in this climate:
- Grade soil away from every post. Water that drains away cannot pool, freeze, and heave.
- Fill gaps at the base promptly. If freeze-thaw opens a gap around a footing, pack it with well-tamped soil or gravel before the next rain.
- Keep sprinklers off the posts. Constant moisture at the ground line feeds rot faster than weather does.
- Stain or seal on the right timeline. New pressure-treated wood needs to dry before stain will absorb, and Chattanooga's humidity stretches that drying time. Sealed posts shed water instead of soaking it up before a freeze.
- Repeat this inspection every spring. Ten minutes of pushing on posts each March catches problems while they are still Bucket 1 fixes.
The signs your fence posts give you after a freeze-thaw winter are early and readable if you know where to look. Catch a lean or a loose footing in year two, and you are tamping soil. Ignore it until year five, and you are replacing posts and panels. For a fence you just invested in, that spring walk-through is the cheapest insurance you will ever carry.
If you need fence repair, Chattanooga Fence Builders can help.
Prefer to talk it through? Call (423) 615-8548 — a quick call is usually the fastest way to get a straight answer for your situation.