Step-by-Step Process for Repairing Rotted Wood Fence Sections Safely
Rotted wood fence sections do not fix themselves, and they get more expensive the longer they sag. The good news is that the step-by-step process for repairing rotted fence posts is straightforward once you know where the rot usually hides and what order to work in. This guide walks through that process the way a Chattanooga crew would approach it, so you can either do the work yourself or know exactly what you are paying for when you hire it out.
This matters most if you are watching every dollar. A targeted repair that saves your existing posts and concrete footings often costs a fraction of a full fence replacement. For a landlord with a tenant turnover inspection coming up, or a homeowner who needs the yard secure for a dog, a smart repair buys you years without draining savings.
Why Wood Fences Rot in Chattanooga
Chattanooga's humidity, seasonal rain, and clay-heavy soil work against wood fences year round. Water pools against the bottom of pickets, the clay holds moisture against posts at ground level, and freeze-thaw winters shift footings and open gaps where water gets in.
Posts almost always fail first, and they fail at the ground line. A fence can have well-maintained, repainted panels sitting on posts that are soft as cork where they meet the soil. That is why the step-by-step process of repairing a rotted section always starts below the pickets, not with the boards you can see.
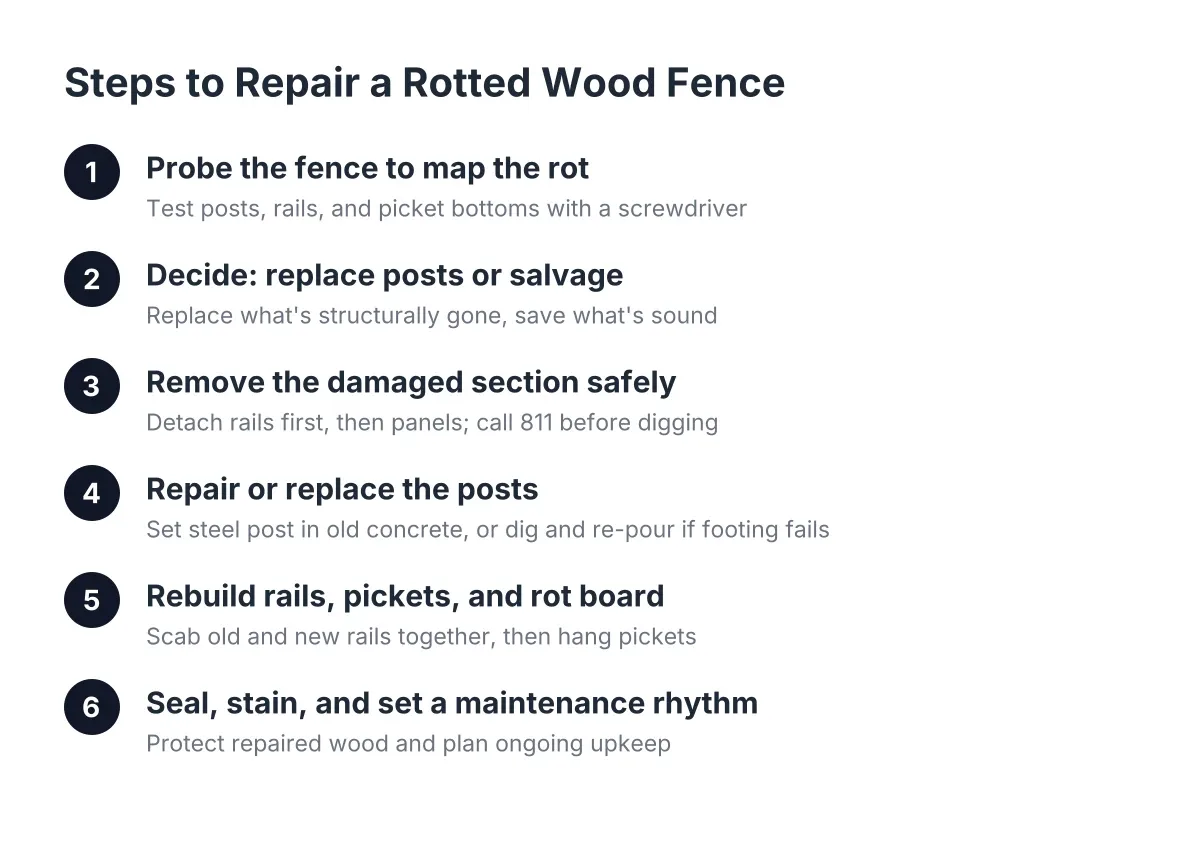
Step 1: Probe the Fence to Map the Rot
Before you buy a single board, find out how far the rot goes. Take a flathead screwdriver and press it into the wood at every suspect spot. Solid wood resists; rotted wood gives way with light pressure.
Check these locations in order:
- Each post at ground level, on all four sides
- The bottom rail, especially where it meets the posts
- The bottom few inches of pickets, where they wick water from the ground
- Any spot where soil, mulch, or leaves pile against the fence
Mark every soft spot with chalk or tape. If more than a few posts in a run are gone, pause and do the repair-versus-replace math before you continue. A repair that touches most of the fence usually stops being the budget option.
Step 2: Deciding When to Replace Posts and Salvage What You Can
The decision rule is simple. Replace what is structurally gone, save what is still sound. Pickets with surface rot at the bottom can sometimes be trimmed. A rail that is soft in the middle must go. A post that is rotted at the ground line needs attention even if the top looks fine, because the ground line carries the load.
Here is where homeowners waste money. The first instinct when a post rots is to dig out the post and its concrete footing and start over. That is the hardest, most expensive version of the job. If the footing is solid, you can often cut the post off above the rot and set a new steel post into the original concrete. You skip the digging, skip the new concrete, and keep the fence on its original line. When dealing with repairing rotted fence posts, this method—cutting the post off above deteriorated wood and setting a new steel post into the original concrete—keeps costs down and avoids extensive digging and new concrete work.
This interim approach has another benefit for budget-boxed owners. It stops the fence from sagging or falling now, and the cost you spend effectively carries forward toward a future full replacement with steel posts. You are not throwing money at a dying fence; you are staging the upgrade.
Step 3: Remove the Damaged Section Safely
Work in the right order and the demolition goes fast. Unscrew or pry the rails free from the posts first. Once the rails are detached, the panels come off in whole sections you can stack and carry, instead of ripping pickets off one at a time.
A few safety points matter here:
- Wear gloves and eye protection; rotted wood splinters unpredictably and old fasteners snap.
- Have a helper brace the panel before you free the last rail, so it does not fall on you or into the neighbor's yard.
- Call 811 before any digging, even if you only expect to dig one post hole. Utility lines do not care that the job looked small.
- Watch for wasp nests inside hollow or split posts, a common surprise in late summer.
Set reusable panels aside flat so they do not warp while you work on the posts.
Step 4: Repair or Replace the Posts
If the footing is sound, cut the old post flush above the deteriorated wood and mount a steel post or post-repair bracket into the existing concrete. If the footing is cracked or heaving from freeze-thaw cycles, dig it out and set a new post with fresh concrete, crowned at the top so water sheds away instead of pooling against the wood.
In Chattanooga's clay soil, drainage around the footing matters as much as the concrete itself. Clay holds water against the post like a sponge. Slope the soil away from each post and keep mulch from piling up around it.
Give new concrete time to cure before you hang panels back on the posts. Rushing this step is how a repaired fence ends up leaning within a year.
Step 5: Rebuild Rails, Pickets, and the Rot Board
With posts solid, rebuild from the frame out. Install new rails where the old ones failed. Where a new rail meets an old one mid-run, overlap a scab rail segment across both ends and fasten it with brackets. That ties the old and new sections together structurally instead of leaving a weak joint.
Next, hang the pickets. If you are mixing salvaged panels with new sections, put full, matching panels in the most visible parts of the yard and any cut or shortened sections in less visible spots. At a corner where a full panel will not fit, measure the gap, cut a section to size, and add a picket at the corner to hide the cut edge. When repairing rotted fence posts and sections, install new rails where the old ones failed and then hang the pickets.
Finish the bottom with a pressure-treated pine rot board running along the ground line. The rot board takes the moisture hit from pooled water so the pickets above it do not wick it up. When the rot board eventually fails, you replace one cheap sacrificial board instead of a row of pickets. For cedar fences in a wet climate, this one detail does more for longevity than any stain.
Step 6: Seal, Stain, and Set a Maintenance Rhythm
New pressure-treated wood needs to dry before it will take stain, and Chattanooga's humidity stretches that curing time. Staining too early traps moisture and the finish fails. Test by sprinkling water on the board; if it soaks in rather than beading, the wood is ready.
After that, a simple annual rhythm keeps the repair from repeating:
- Walk the fence line each spring and probe posts at ground level.
- Keep soil, mulch, and leaves off the bottom rail and rot board.
- Tighten loose fasteners and gate hardware before they stress the posts.
- Re-seal or re-stain when water stops beading on the surface.
When to Handle the Repair of Rotted Fence Posts Yourself and When to Call a Pro
A handy owner can handle rot repair on one or two sections: a weekend, basic tools, and a helper. Hire a professional when multiple posts have failed, when footings are heaving or cracked, when the fence sits on a slope or property line you are unsure about, or when a gate is involved. Gates concentrate stress, and gate repair done wrong fails fast. Local permit and property line rules also vary between Tennessee and Georgia sides of the Chattanooga area, so confirm your line before setting any post near it.
For example, suppose a landlord in Hixson finds three soft posts and a collapsed bottom rail during a turnover inspection, with the tenant moving in next week. In that scenario, a crew doing the step-by-step repair process, cutting the rotted posts, setting steel posts into the existing footings, scabbing the rails, and adding a rot board, could have the yard secure in a day or two. Full replacement of the same run would cost multiples of the repair and take longer to schedule.
The honest trade-off: a sectional repair will not make a 20-year-old fence new, and new boards will not match weathered ones until they gray out. If rot has reached most of the posts, repair money is better put toward replacement. Any fence repair contractor worth hiring will tell you which side of that line your fence sits on before quoting the work.
How Long Does Repairing Rotted Fence Posts Take?
Repairing one or two rotted wood fence sections typically takes a day of working time, plus curing time if new concrete footings are poured. Steel-post-into-existing-footing repairs go faster because there is no digging and no fresh concrete to wait on. Larger wood fence repair jobs involving several posts, new footings, and staining can stretch across several days, mostly waiting on concrete and wood to cure rather than labor.
Weather is the variable. Wet clay is miserable to dig and slow to drain, so a dry stretch makes everything easier. If you are scheduling a crew, a short window of dry weather is the right time to book.
Follow the process in order, probe before you buy, save the footings where you can, and protect the bottom of the fence with a rot board. Do that, and a rotted section becomes a manageable weekend project or a modest contractor invoice instead of a full replacement bill.
If you need fence repair, Chattanooga Fence Builders can help.
Prefer to talk it through? Call (423) 615-8548 — a quick call is usually the fastest way to get a straight answer for your situation.